Tutorials > Photoshop > Web Photo Gallery
If the images on this page do not appear, please click here.
In this tutorial you will learn how to use Photoshop's automated Photo Gallery tool to create your own web photo gallery.
What is the Web Photo Gallery?
The Web Photo Gallery is a convenient feature that automatically and quickly creates a Web site that displays a series of images in thumbnails and larger formats. This process automatically optimizies the images and writes HTML to produce a Web site suitable for publishing online.
The Web Photo Gallery Tool in Photoshop has many styles available, but it can be customizied even further in any HTML editor.
1. Before you even get started in Photoshop, you will need to create a folder somewhere and place all of the images in it that you would like to use in the gallery. The dimensions of the images do not matter since Photoshop will automatically resize them for you. If you already have a folder with images that you would like to use, go on to the next step.
2. For this excercise you do not need to open a document right away, simply open Photoshop. In Photoshop, go to File > Automate > Web Photo Gallery. A new window will appear. From the Styles menu select one of the preset styles available. Some of them are very basic, while others are more complex and include slideshows and forms for feedback. For now I am going to select Horizontal Slideshow. After selcting your style, enter your e-mail address.
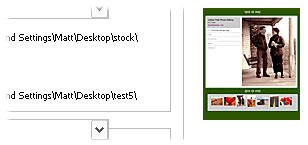
3. In the Source Images area, make sure that Folder is selected. Below it, click on the Browse button to find and select the folder of images that will be used in the gallery. Next click on the Destination button to tell Photoshop were to put the final gallery files that Photoshop will create. Create a new folder somewhere on your computer and name it Web Photo Gallery, or any name of your choice.
Customization
4. Besides manual editing in an HTML editor, you can make some modifications to the style of the web gallery in Photoshop. The last item in the window is the Options area. Start out by selecting General from the drop-down menu. The only thing to change here is the page file format. Most likely you will want to leave it as is with a .html file extension.
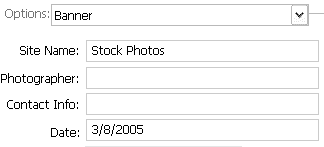
5. Next select Banner from the drop-down menu. Here you can change the name of the gallery site and other site information.