


Tutorials > Photoshop > Gold Text Page 2
If the images on this page do not appear, please click here.
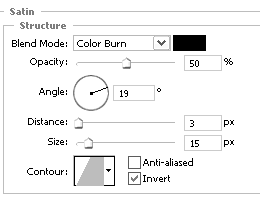
4. Next use the following settings for Satin. Double-click on the Contour image to open the Contour editor to adjust the settings.
5. Finally, use the following settings for a Gradient Overlay.
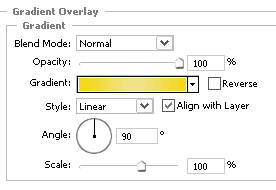
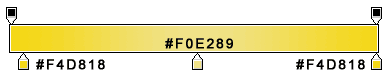
To edit the gradient, double-click on the current gradient(the colored area shown above) to bring up the Gradient Editor. Start off by moving the little boxes to the positions shown below. Then click on each of the little boxes to edit their colors. After clicking the boxes, you will see a color option below it. Just click on the current color to change the color to the hexidecimal values provided below.
You might want to use the same gradient again in other pieces, therefore you should save the gradient. In the Gradient Editor, enter a name for the gradient, such as Gold Text Gradient, then click the New button. You can then close the Gradient Editor by clicking ok.
Congratulations, your text is now golden.

Affiliates


Resources
