


Tutorials > Photoshop > Rayburst Light Text Effect Page 2
Learn how to add a colorful rayburst light effect to text in Photoshop.
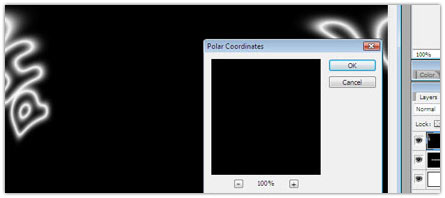
8. With the text layer selected, use the keyboard shortcut Ctrl+J or go to Layer > Duplicate Layer to make a duplicated layer of the Photoshop text layer. After doing this, go to Filter > Distort > Polar Coordinates. Select the Polar To Rectangular option at the very bottom and then click OK.
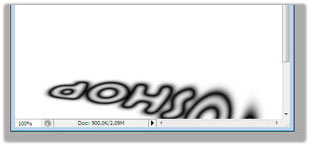
9. Next go up to the Image menu at the top of the screen, select Rotate Canvas, and then choose 90� CW to rotate the canvas 90 degrees clockwise. Then use the keyboard shortcut Ctrl+I or go to Image > Adjustments > Invert to invert the image, so black becomes white and white becomes black.
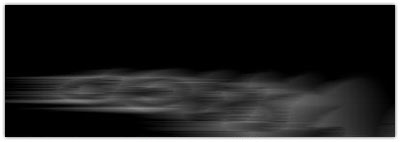
10. Next we will begin to add some excitement (rays) to the text. Start off by going to Filter > Stylize> Wind. Make sure Method is set to Wind and Direction is set to from the right. Click OK to apply the Wind filter once. Then press Ctrl+F to apply this filter one more time.

11. There are still a few more steps of image adjustments and transformations to complete, but will soon begin to take shape. Before continuing, the image needs to be reverted back to white text on a black background. To do this use the keyboard shortcut Ctrl+I or go to Image > Adjustments > Invert. Follow this up by pressing Ctrl+F four times to reapply the past filer effect (Invert) four times to create the desired effect.
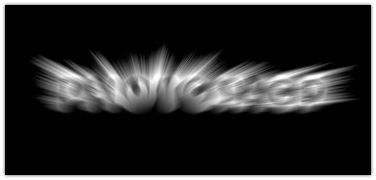
12. We need to brighten the image again using Levels. To do that, press Shift+Ctrl+L or go to Image > Adjustments > Levels to apply the Auto Levels command to the image. After doing this, rotate the image again by going to Image > Rotate Canvas. This time choose 90° CCW to rotate the canvas back to the way it was originally. Finally, go to Filter > Distort > Polar Coordinates. This time choose the Rectangular to Polar option and click OK.
13. The final result is near! In order to see the text easier, we need to change the layer's blending mode so that the original text layer below shows through a bit, making the font more readable. To do this change the blending mode of the text copy layer from "Normal" to Screen< in the layers palette./p>

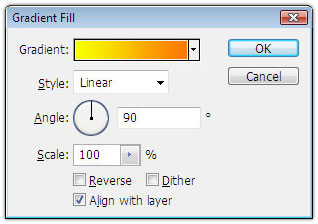
14. Next click on the New Fill Or Adjustment Layer icon at the bottom of the Layers palette and select Gradient. Choose a gradient color. and click OK. (The New Fill or Adjustment Layer icon is the middle icon at the bottom of the Layers palette that looks like a have colored in circle.) After doing this, set the blending mode of the gradient fill layer just created to Color via the dropdown menu in the top-left corner of the layers palette.
15. Final result!

View our entire collection of photoshop tutorials.
Jilson Thomas is the owner of Ramakkalmedu.com.


