Tutorials > Photoshop > Rayburst Light Text Effect
Learn how to add a colorful rayburst light effect to text in Photoshop.
Example of final product:

1. Create a new document that is fairly large; I'm going to create one with a height of 640 pixels and width of 480 pixels.
2. Before adding any effects, we must first add the desired text to our document. Using the Horizontal Type Tool (T), add some text to your document with a large font size (for the most dramatic effect).

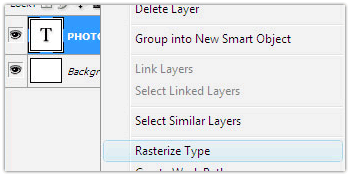
3. Some commands and tools, such as filter effects and painting tools which we will need to apply on our text in this tutorial, are not available for type layers. You must rasterize the type before applying the necessary filters and effects. Rasterizing converts the type layer into a normal layer and makes its contents uneditable as text. To Rasterize the text so that we can apply effects and filters to it, right click on the appropriate text layer in the layers palette and select Rasterize Type. Alternatively, you can go to Layer > Rasterize > Type.
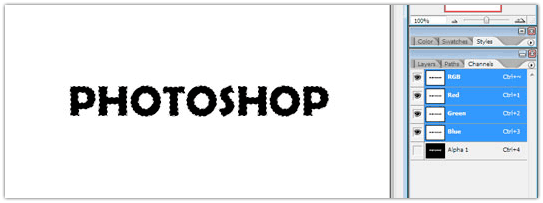
4. Before we begin to add effects to the text, the text outline must first be selected. To do this, press the Control key and click on the text layer at the same time (Ctrl+Click). With the text selected, go up to the Select menu at the top of the screen and choose Save Selection. When the Save Selection dialog box appears, just click OK. There's no need to name it or make any changes to the options. Once you have saved your selection, press Ctrl+D to deselect your text.
Switch over to your Channels palette for a moment (it's grouped in beside the Layers palette). You'll see your selection saved as a new channel named "Alpha 1" at the very bottom.
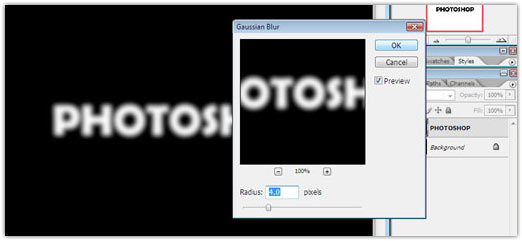
5. Switch back to your Layers palette once again, and with the text layer selected, go up to the Edit menu at the top of the screen and choose Fill. When the dialog box appears, set the Contents to White and change the Blending Mode to Multiply.
Next go to the Filter menu, choose Blur, and then choose Gaussian Blur. Enter a Radius value of about 4 pixels and click OK to apply.
6. With the "Photoshop" texy layer still selected, go back up to the Filter menu and this time choose Stylize, and then choose Solarize.

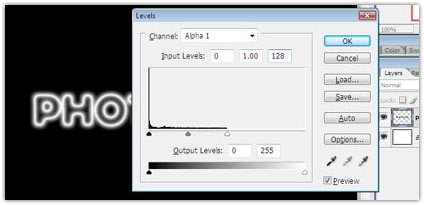
7. Next go to Image > Adjustments > Levels (Ctrl+L). Enter the following settings (or similiar): 0, 1.00, 1.28.