


Tutorials > Photoshop > Object Focus
Learn how to draw a viewer to the central part of an ad or image.
If the images on this page do not appear, please click here.
One of the most effect design methods used in advertising today draws the viewer to a central part of the ad, the product. Learn how to create this effect with images containing vibrant colors.
1. In order to pull off this effect with the best result, open up an image in Photoshop that contains well contrasted colors. In most forms of this effect, the background has a grey tint to it. Try to avoid using images in which the object you want to focus contains a large amount of black and whites. I'm going to use a stock image of a pair of headphones. If you would like to use this image, download it here.
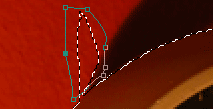
2. Grab the Magnetic Lasso Tool and make a selection around the object that you want to focus in on. For the best result you will need to zoom in. Outline the object slowly so the computer can accuratly trace along the object. Although pinpoints will automatically created as you go, it is best to create your own additional pinpoints as you go along; especially around corners. To create a pinpoint, just click the left button on your mouse. (Don't worry right now if you accidentently make a selection outside or inside the desired selection.) In order to complete the selection you must start and end at the same point.
Magnetic Lasso Tool Tips
When using the Magnetic lasso tool keep in mind the following tips: Press Caps Lock to turn your cursor into a circle that indicates how large of an area the tool is looking in. Type [ or ] to change the size of the circle. Option-drag to temporarily switch to the normal Lasso tool. Press Escape to cancel a selection. Click to manually add an anchor point.
3. If you made a mistake in the selection, it can easily be fixed. During my selection my mouse went out of the boundary, creating an unneeded part of the selection. To solve this, select the Subtract from selection button and outline the area you want to get rid of as shown below.

If you need to add to the selection, click the Add Selection button to the left of the subtract selection button and make a selection of the area to add.
4. Next copy the final selection by going to Edit > Copy(Ctrl+C). Then create a new layer and go to Edit > Paste. Your new selection is now in its own layer.
5. To see what it looks like, disable the layer containing the original image. With the image that I'm using, there is also a center area that still contains the background from the orignal image. To get rid of this, copy the current layer then create another selection as before using the Magnetic Lasso Tool. Once the area is selected, press the delete key on your keyboard to get rid of the center of the headphones. Then disable the layer containing the first selection.
6. In order to get the object to stand out as desired, the layer with the orignal layer first needs turned on by click on the box where the eye would appear. This image needs to removed of most of its color in order to make the object stand out. To do this, go to Image > Adjustments > Desaturate.

7. If your final selection has any jagged edges and does not blend well with the background, click on the top layer with the final selection and use the Blur Tool to smooth out the edges.
Click the image to see the finished product with some added effects.


