


Tutorials > Photoshop > Content Box
Learn how to create trendy XP styled content boxes.
If the images on this page do not appear, please click here.
1. Create a new document approximately 350 x 250 with a white background. Press "D" on your keyboard to reset the colors to the default settings. Create a new layer by going to Layer > New > Layer and name it "Box Bg". Then grab the Rounded Rectangle Tool from the toolbox then go up to the options bar and change the radius to 18px. Leave the rest of the options at the default settings. Then create a simple box as shown below.

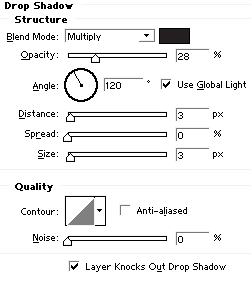
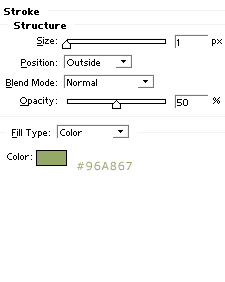
2. In the layers palette, click on the litte "f" and select "Drop Shadow". Use the settings in the following image then move on to "Stroke". Once you are done, don't click ok yet; we still have a gradient to add.
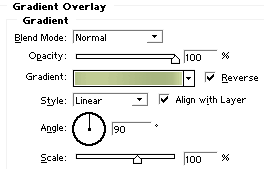
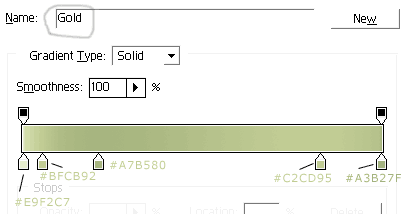
3. Next select "Gradient Overlay". For the gradient, double click on the box next to the word "Gradient" (colorful part) to bring up the Gradient Editor. Use the settings in the image. Make sure you name the new gradient "Gold" and press the "New" button to save the gradient, since we will be using this gradient again later in the tutorial. Finally, change the fill to 50%.
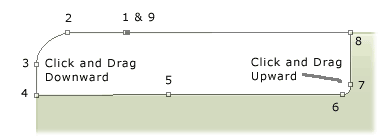
4. Create a new layer named "Content Tab". Now select the "Pen Tool" and magnify the image to 500%. Make sure the tab called "Shape Layers" is selected in the options bar (this is next to the tool preset picker in the far left) and create an outline of the tab using the image below as a reference. Many people find the pen tool difficult to use, so I've named each point and added notes when neccessary. Once you are done, the points should go away. If they don't, check to make sure points 1 and 9 are in the same spot.
Tutorial continues on page 2.
Affiliates


Resources
