


Tutorials > Photoshop > Postage Stamp Page 2
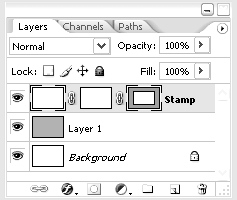
5. Next add a layer mask to the stamp layer by clicking on the Add Layer Mask icon in the bottom of the layers palette. (It is the second from the right in CS and third from the right in CS2.) Your layers palette should now look like the following.
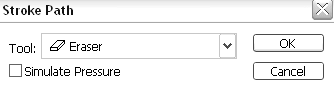
6. We're finally about to create the final stamp effect needed. Select the Rectangle Tool and make sure that Paths is still selected in the options bar. Make sure that the Stamp layer is selected. Then right click in the white box for the stamp that was previously created. Select Stroke Path. In the next dialog box, select the eraser tool.
7. You may notice a thin black line that runs around the stamp shape. In order to get rid of this, right-click on the Vector Mask thumbnail for the Stamp layer and select Rasterize Vector Mask. (The vector mask thumbnail is the last one on the right in the stamp layer as shown in the image in step 5.)
8. The postage stamp is almost done. Go ahead and ad a small drop shadow to the stamp layer if you'd like. Then add your stamp image. (If the image is not already sized right, use the Free Transform Tool to adjust it's size.) Add some text and your done.


