


Tutorials > Photoshop > Color Restoration
If the images on this page do not appear, please click here.
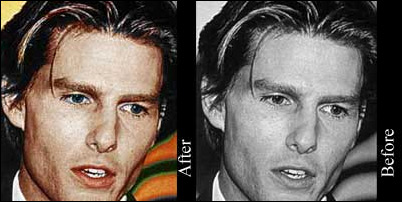
This tutorial will teach you how to colorize a black and white image.
1. Create a new file in Photoshop with the black and white image you are going to add color to. In my case I used Tom's picture while he was still a vampire. You can get Tom's image here.
I recommend you to use this image, in order to achieve what I have in the end. Due to the way some photographs are taken, the results may very if you are going to use my values on whatever image (other than mine) you are using. You will have to play around with the colors values, if you are going to use a different image. And I assume that you have studied the color of people skins and how they change in different lights and places. If you have what it takes, let's move on.

2. Duplicate the original layer. Lock the original layer by clicking on
the lock next to "Fill" in the layer palette since we are going to be working
on the duplicated layer only.
Now it's time for some magic. Chose the magic wand tool from the tool bar
and select the area you want to colorize first. Note: you can use other
tools you are comfortable with while doing the selection (ie: Lasso tools).
Tip: To continuously select the areas; Hold the shift key while making your selection. That will keep the selection you made previously together with next ones.
3. Hopefully your layers look like the image below.
Image > Adjustments > Color Balance
and enter following values:
Midtones: 48,00,-35
Shadows: 19,00,00
Note: I will not touch the highlights for this image. So you can touch on this effect when you are using other images.
4. After you have gone through all the details on lips, eye brows and eyes, you will get something like mine here. And we are done. Just in 3 steps.
PS: In order to achieve darker eye brows and better shawdows you might want to select the eye brows area and copy, paste in new layer. Adjust the brightness and change layer mood to "Overlay". I duplicated my final results and used an overlay effect to get sharper image.
There you have it! Colorizing a black and white image in a few steps.
Tutorial Submitted by: Danesis
Affiliates


Resources
