

Tutorials > Photoshop > Professional Navigation Buttons
Create gradient navigational buttons with individual link shapes.
Final Product:
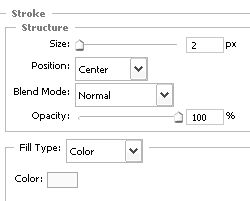
1. Start out with a new 200px wide x 75px tall image with a white background. Create a new layer titled Button Shape by going to Layer > New > Layer. Using the Rectangular Marquee Tool, create a rectangular selection for the button and fill the selection in white. Next right-click on the layer and select Blending Options. Use the following Stroke settings.

2. Next Ctrl+click on the Shape layer then create a new layer titled Gradient. To leave some of the white below, go to Select > Modify > Contract and enter 2 pixels.
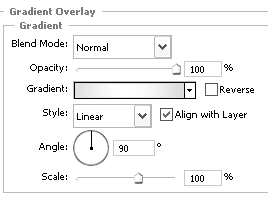
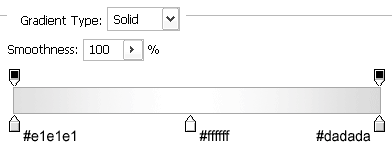
Then fill the selection in white. To add the gradient, right click on the current layer (Gradient). Use the following settings for a Gradient Overlay. In the Gradient Overlay, click on the current gradient that is displayed to bring up the Gradient Editor. Use the settings in the second image for this.

All wireless internet providers are having the time of their lives right now. Every one has heard of wifi service, and wants one for himself. Services like verizon wireless go out of their way, offering wireless internet booster as well. The wireless internet service package offered by the cingular wireless by far supersedes them all.


