


Tutorials > CSS > Expanding / Collapsing Sidebar
Create a cross-browser, validating, expanding and collapsing sidebar using CSS and Javascript.
Before CSS began coming into its own, making things move around your webpage required lines and lines of intricate JavasSript. Designers had to calculate everything from screen height to mouse position, and even then there was no guarantee that the end result would work across different browsers. Well, not anymore!
In the following tutorial, I'm going to demonstrate how to make a cross-browser, validating, expanding / collapsing sidebar. While you still need a few lines of JavaScript and a small amount of math, the process is by far easier and shorter than it once was.
Getting Started:
While this tutorial is simple enough for a beginner to work through, a basic understanding of CSS and JavaScript will make things much easier to follow.
Understanding the CSS:
The first, and most complicated thing that we need to do is write our CSS. We're going to start with a container div that will house the sidebar and our main content area. The sidebar will then be divided into two divs, one that contains its textual content, and another that contains our image that we'll click to expand / collapse the bar.
Here's a diagram to illusrtrate:
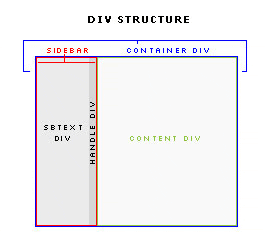
Let's start with our container div. You can style this however you want. I'm going to make it 600px wide and centered horizontally on the page. I'm not going to worry about applying any more style elements to it, though you certainly could if you wanted to. For the purposes of this example, though, the only real essential part to remember is that the width is 600px. This will be needed later when we calculate widths for other elements.
#container {
    width:600px;
    margin:0 auto 0 auto;
}
Simple enough. Let's move on to the fun stuff. Now we'll need to set the styles for our sidebar and the various divs within it. Note that we're not specifying a width here. The width of our sidebar will be placed inline later, to be grabbed by our JavaScript.
#sidebar {
	float:left;
}
We float the sidebar to the left side of the "container" otherwise, our sidebar and content box would stack one atop the other, rather than side by side. Now we'll define the CSS for the div inside of the sidebar that's going to hold its textual content. All we're doing here is setting some padding so that we're not bumping our text right up to the edge of the divs. This is purely cosmetic. The paddings specified here are for the top, left, bottom, and right of the div, in that order.
#sbText {
    padding:10px 10px 0 10px;
}
The last step in establishing the CSS for our sidebar is to definie the rules for the div that will contain the image we'll click to toggle the bar's display.
#handle {
    float:right;
    width:10px;
}
Just as we floated the sidebar to the left of our container div to keep the elements from stacking, we'll do the same with our "handle" div - except we'll put it on the right side.
Once the CSS for our sidebar is completed, we'll move on to the main container. Again, we won't define a width in our CSS, because this will be placed inline to be grabbed by the JavaScript, just like the width of the sidebar will be.
#content {
    float:left;
    padding:10px;
    border-left:1px solid #000;
}
We'll float this to the left as well, so that it will butt up nicely to the "sidebar" div. We're applying an optional border here, just so that we can more easily differentiate the seperation from "sidebar" and "content" - you don't need to do th is, but if you do, it's going to figure in later when we start calculating widths for our inline styles.
That about wraps it up for the CSS. You can apply any cosmetic stylings you wish, but for now, this will demonstrate the basic functionality and I feel that it's best to keep things simple while you're learning.
Tutorial continues on page 2.Affiliates


Resources
