


Tutorials > Photoshop > Real Estate Web Design - Page 2
Create a clean and contemporary website design for a real estate related website.
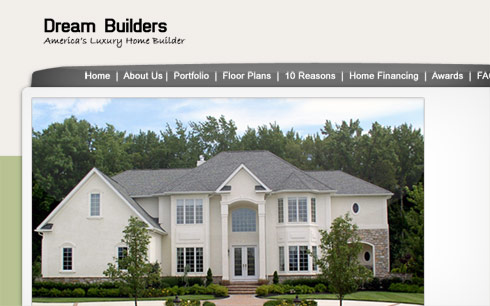
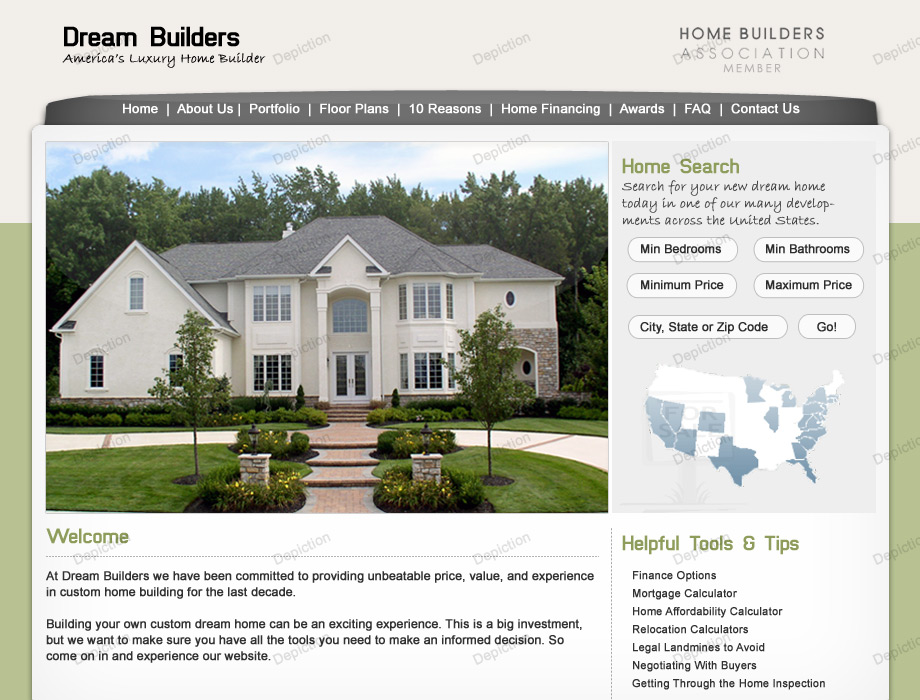
5. Go ahead and add a logo and some placeholder links in the navigation bar. For an added effect to make this layout appear more like a "Web 2.0" layout, add some gloss to the navigation bar. To do this, create a new layer above all current layers and select the Elliptical Marquee Tool. Create a select that covers the upper half of the navigation bar, fill it in white, and change this layer's opacity to approximately 10-15%.

6. Now let's add a nice photograph in the top left corner of the main table. We will later add a box next to the image to add a home search capability. If you do not have an image, you may use the one I picked up at sxc.hu. Click here to get it. You will want to resize the image so it doesn't overtake the layout; I resized mine to approximately 560px wide by 370px tall. I also added a 1px stroke outline, a drop shadow, and a very subtle gradient on the upper half of the image just as I did for the navigation bar.
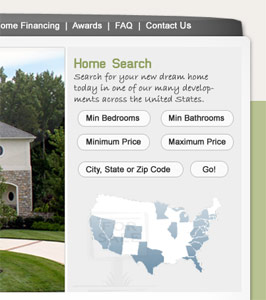 7. It is very common for real estate websites to have some type of search that allows you to easily see what properties are up for sale.
Since this is a useful tool, let's add one next too the image that you just added. Start off by creating a new layer, select the
Rectangular Marquee Tool, and create a selection that fills up the rest of the row to the right of the house image.
This will serve as a special background for this box. I filled mine in with a light gray color (#eeeeee) to ensure
that the content placed on it will still be easily readable.
7. It is very common for real estate websites to have some type of search that allows you to easily see what properties are up for sale.
Since this is a useful tool, let's add one next too the image that you just added. Start off by creating a new layer, select the
Rectangular Marquee Tool, and create a selection that fills up the rest of the row to the right of the house image.
This will serve as a special background for this box. I filled mine in with a light gray color (#eeeeee) to ensure
that the content placed on it will still be easily readable.
Fill in the box with a title, some descriptive text, and a couple of search fields. For the search fields I used the Rounded Rectangle Tool. As an added effect, I also added a for sale sign and a map of the United States.
8. Next we are going to create a small divider to separate the main content and sub-navigation sections. For this, we will be using a pattern. Start off by creating a new 1px wide by 3px tall image with a transparent background. Using the Pencil Tool, color in the first two blocks in black as shown below.
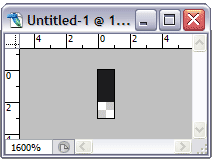
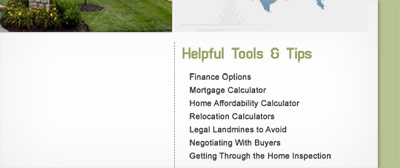
In order to use this, it needs to be set as a patten. To do this, go to Edit > Define Pattern. Give it a title then save it. Go back to the original document, create a new layer titled Right Column Divider, and select the Rectangular Marquee Tool. Create a tall, yet very thin selection for the divider to go in. Now go to Edit > Fill. Select the newly created pattern and click Ok. You should have a divider as shown below. I also went ahead an added some content in the right side column.
9. Finally create another pattern as done in the previous step, but intead make it 3px wide by 1px tall. Use this pattern to create a divider that will separate the header title and the page's content. Then add some filler text and add any additional enhancements that you would like to make. You can click the image below to view the final product.
Affiliates


Resources
