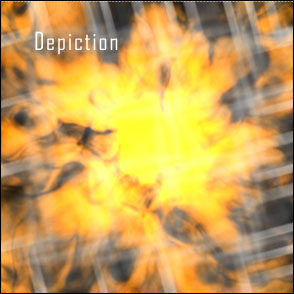
Tutorials > Photoshop > Plasmic Fire
Create a smoldering plasmic fire.
If the images on this page do not appear, please click here.
This is a unique tutorial because you will never get the same results two times in a row. So if you're not happy with your results, try again.
1. Start off by creating a new image of any size, just make sure it forms a perfect square. (I set my image size to 294x294.) Create a new layer, fill it in white, and go to Filter > Render > Difference Clouds.
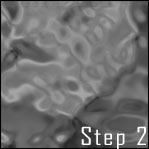
2. Next go to Filter > Sketch > Chrome. Use the following settings: Detail: 3, Smoothness: 7.
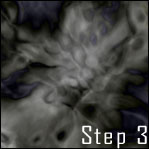
3. Now repeat step one about two or three times or until you are satisifed. Then go to Filter > Distort > Pinch. I set the amount to 55%, but set it to whatever looks best.
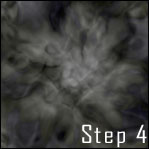
4. Now copy the current layer by dragging the layer to the new layer button and go to Edit > Transform > Rotate 90 degrees CW. Then change the layer opacity for the current layer to 50%, so the image underneath can be seen.
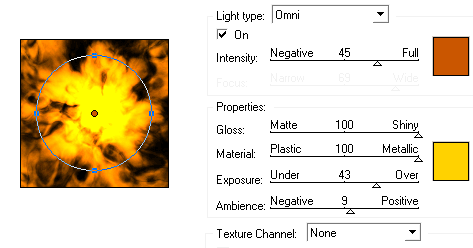
5. Let's make it look like a fire, so click on the top layer then click on the triangle next to the paths tab in the layers palette and select Merge Down. Then go to Image > Adjustments > Equalize. To get the fire effect go to Filter > Render > Lighting Effects. Use the settings in the image below.
6. Make a new layer and set the foreground color to white. To make it look glassy, grab the brush tool, set the brush diameter at the top near the menu to 9 pixels and make a pattern like below. Start off by making the slanted lines from the bottom to the right side of the image, then make the horizontal lines. You'll have to draw the slanted lines freehand, but for the horizonal lines, hold down the shift key and drag the mouse either left or right to make a perfectly straight line.
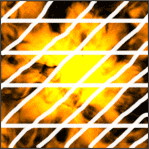
7. Next go to Filter > Blur > Motion Blur. Set the angle to 15 degrees and the distance to 108 pixels. Then copy the layer and go to Edit > Transform > Rotate 90 degrees CW or CCW.
8. There are soo many white blurs that they distract attention from the fire, so lower the opacity for both the white blur layers to about 70% or so.